De 1 martie am păşit pe un nou “tărâm”, acela
al decorării turtei dulci cu royal icing. M-am temut la început, dar până la
urmă a fost amuzantă experienţa şi sunt foarte mulţumită de rezultate, deşi
ştiu că mai am încă multe de învăţat. M-am documentat pe blogul Ritei Oarga, o adevărată
maestră a decorării turtei dulci (puteţi vedea aici creaţiile
ei) – reţeta de royal
icing şi sfaturi
pentru decorat – şi pe site-ul Joy of Baking. Reţeta de
turtă dulce am luat-o tot de la Rita,
dar am personalizat-o puţin, jucându-mă cu aromele: pentru că e primăvară, am
folosit o combinaţie de scorţişoară (ce turtă dulce ar mai fi fără ea?),
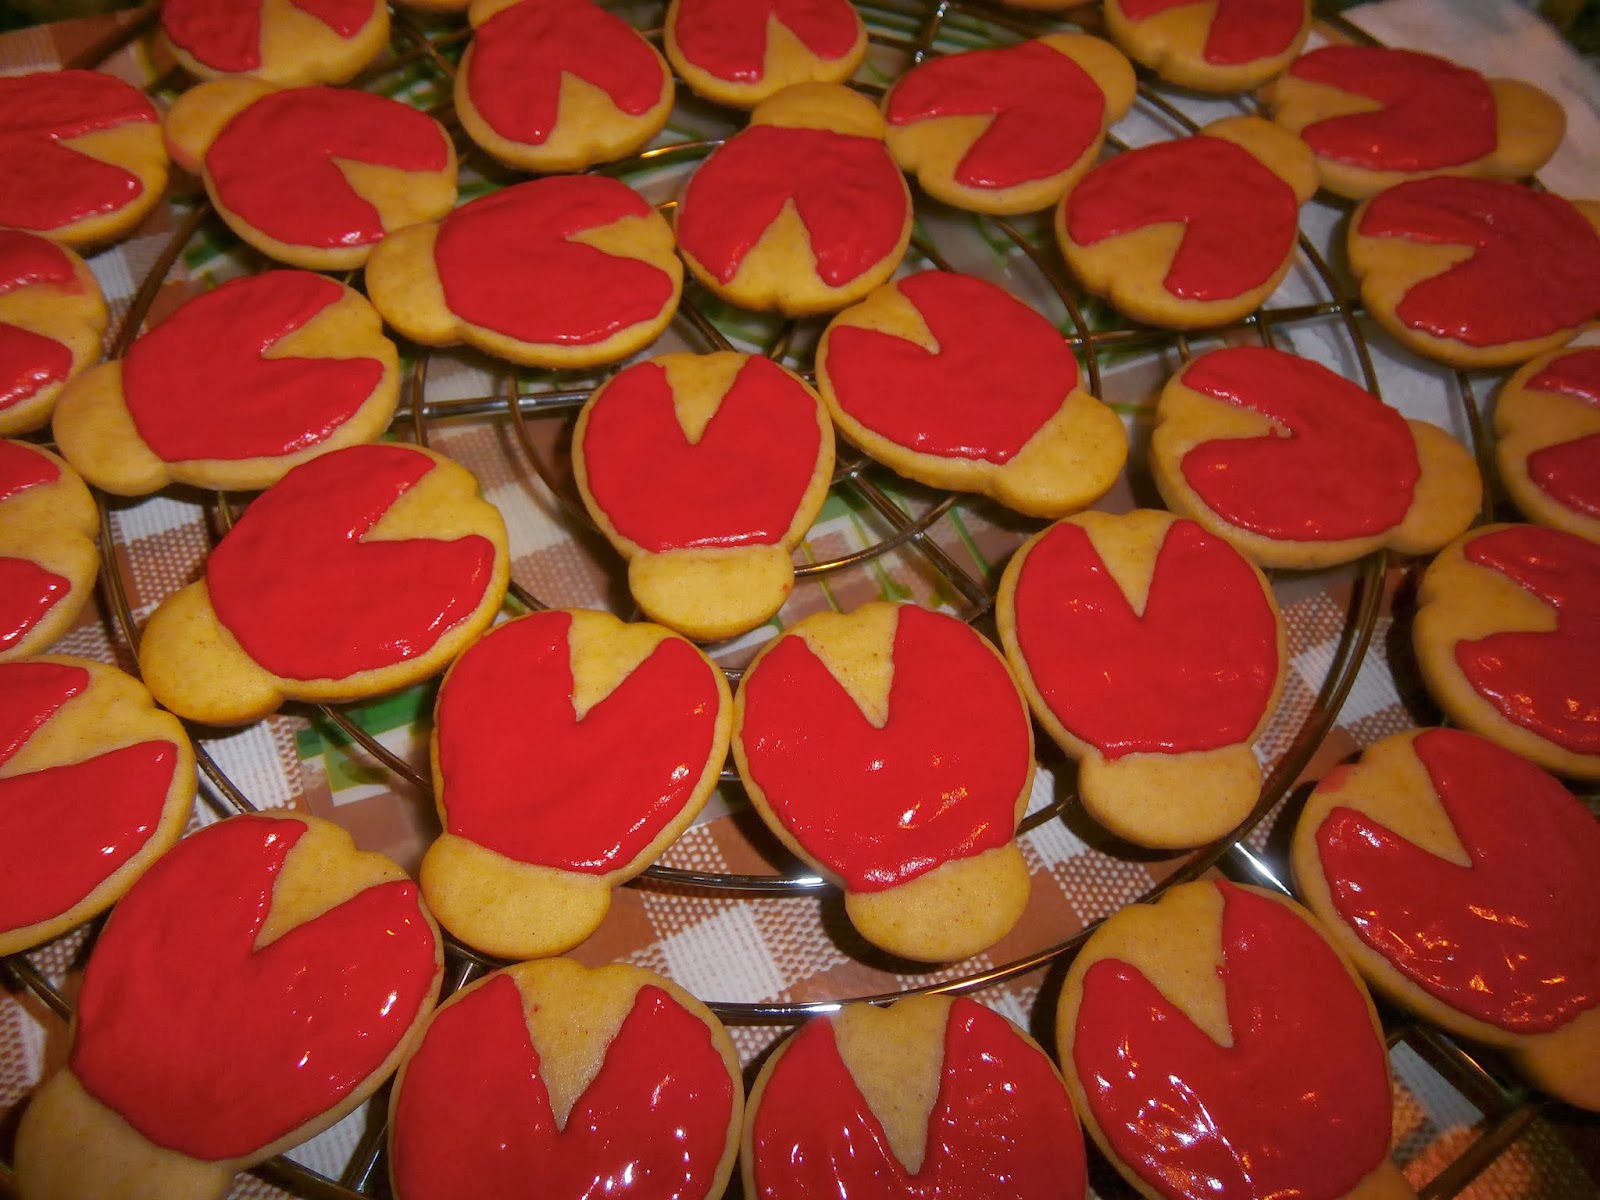
ghimbir, apă de trandafir şi pudră de lavandă. Ce mi-a ieşit? O turtă dulce
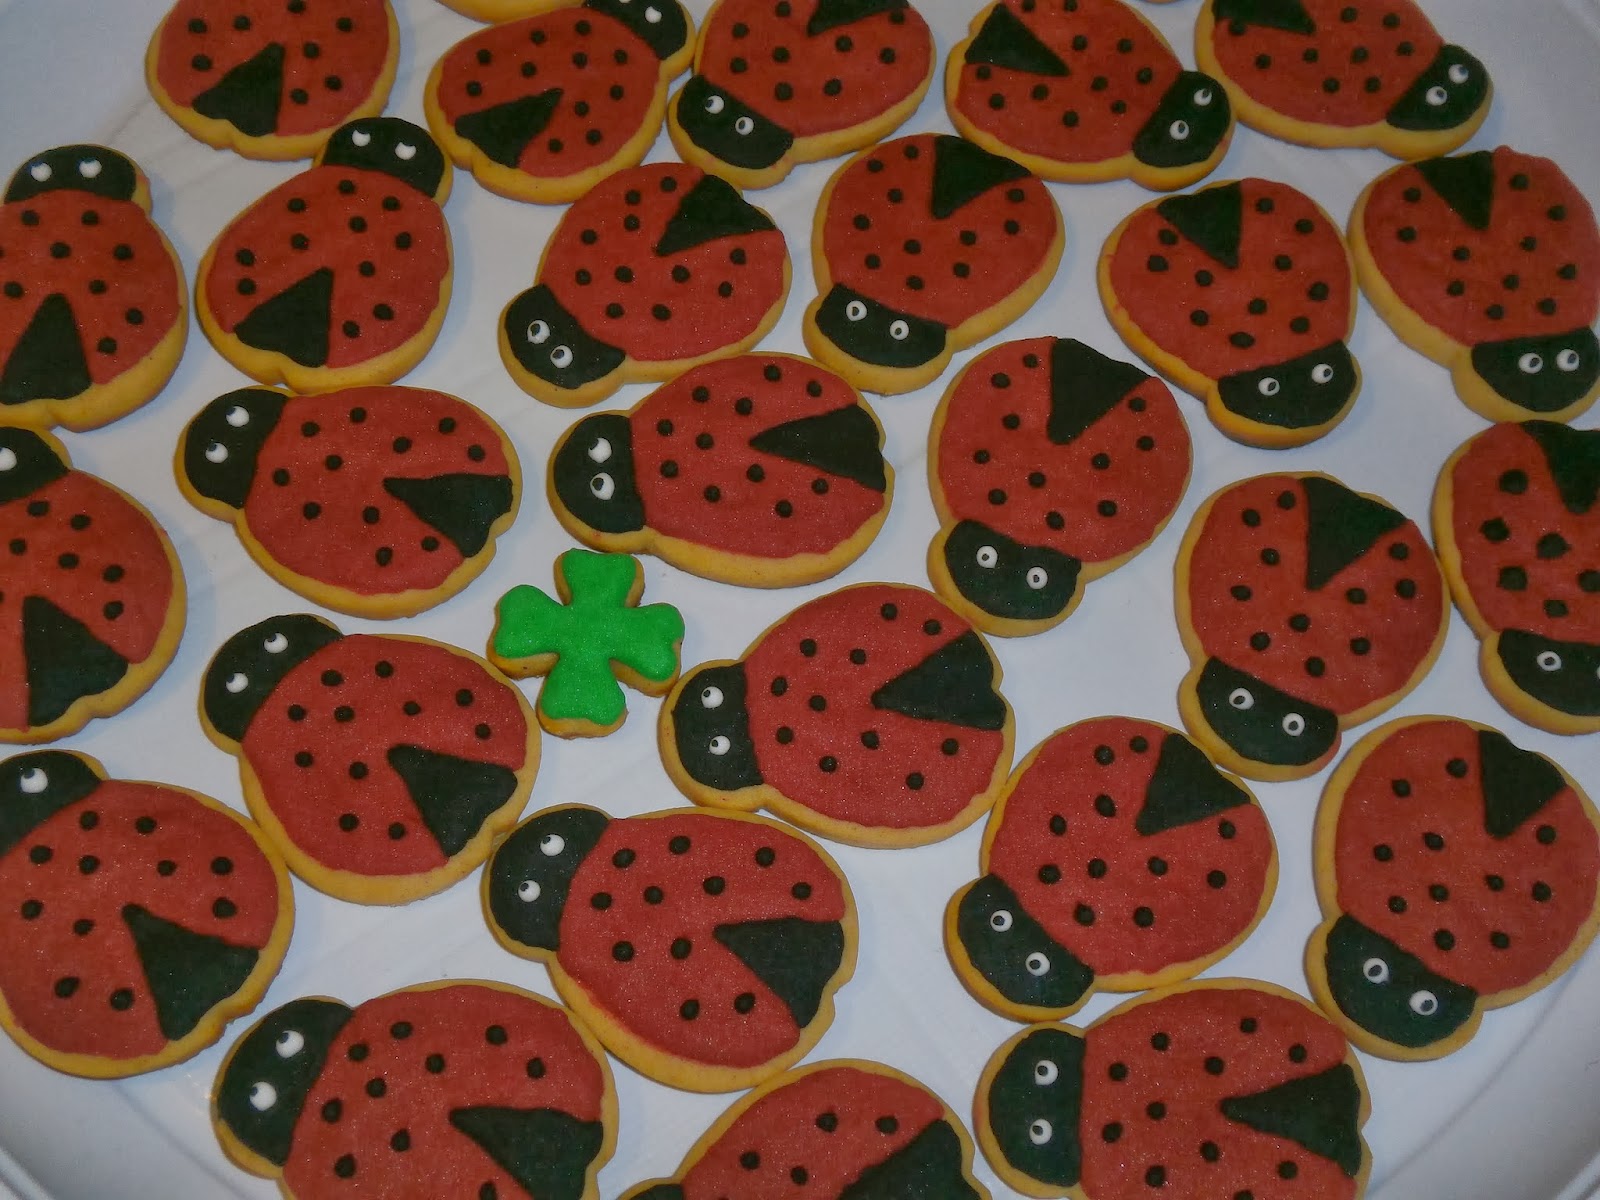
florală, primăvăratică, pe care am tăiat-o în forme norocoase: trifoi,
potcoavă, buburuză şi multe flori.
TURTĂ DULCE PRIMĂVĂRATICĂ

- 1 kg făină
- 4 linguriţe scorţişoară măcinată
- ½ linguriţă pudră de ghimbir
- ½ linguriţă pudră de lavandă
- 1 linguriţă apă de trandafir
- 10 g praf de copt
- 200 g zahăr pudră
- 3 ouă
- 250 g miere
- 300 g unt
Topim mierea şi untul într-o crăticioară, la
foc mic, amestecând din când în când. Lăsăm apoi amestecul să se răcorească.


Amestecăm făina cernută cu aromele şi praful
de copt.


Separat, batem ouăle cu zahărul doar 2-3
minute.


Într-o adâncitură în mijlocul făinii adăugăm
compoziţia de ouă şi zahăr, apoi pe cea de miere şi unt şi apa de trandafir.


Începem să amestecăm cu o lingură de lemn până
începe să se lege, apoi frământăm puţin cu mâna până obţinem un aluat omogen.


Despărţim aluatul în două (sau chiar patru)
bucăţi, pe care le învelim în folie alimentară şi le lăsăm la frigider până a
doua zi (sau măcar 2-3 ore).

Scoatem aluatul din frigider cu 30 de minute
înainte de a-l întinde. Tot acum putem să pregătim tava sau tăvile,
acoperindu-le cu hârtie de copt, iar cu puţin înainte de a începe să facem
turtele dulci, preîncălzim cuptorul la temperatură medie (ar trebui să fie cam cu
30 de minute înainte de a coace prima oară).
Presărăm puţină făină pe blatul de lucru şi
frământăm aluatul cât să se înmoaie puţin şi să aibă o suprafaţă netedă şi
lucioasă (nu ar trebui să fie lipicios, dar dacă este cazul, mai presăraţi
puţină făină).


Întindem aluatul (de preferat bucăţi mici, e
mult mai uşor) pe blatul presărat cu foarte puţină făină (dacă se lipeşte, mai
presăraţi făină, dar nu multă, doar cât să creeze o peliculă fină), până
obţinem o foaie de circa 3-4 mm (mie mi-a ieşit pe alocuri puţin mai groasă,
dar n-am avut probleme la copt).


Decupăm cu ce forme vrem, în funcţie de
ocazie, imaginaţie, cerinţe etc.
Aşezăm formele de turtă dulce pe tavă, la
distanţă unele de altele, şi le coacem cam 5, maxim 10 minute.


Le lăsăm să se răcorească puţin în tavă, apoi le transferăm pe un grătar sau blaturi din lemn până se răcesc complet.


Le lăsăm să se răcorească puţin în tavă, apoi le transferăm pe un grătar sau blaturi din lemn până se răcesc complet.
Depozităm turta dulce în cutii închise bine şi
o putem păstra până la o lună.
Pentru decorarea turtei dulci cu royal icing,
am găsit două posibilităţi:
- pregătim o singură glazură pe care o folosim în varianta consistentă pentru contur şi diferite alte decoruri şi la care adăugăm puţină apă până are o consistenţă uşor fluidă pentru umplerea suprafeţei
- pregătim două glazuri, una consistentă şi una mai fluidă (cu mai puţin zahăr)
Fiindcă era prima oară când am decorat cu royal icing, eu am folosit prima variantă, pe care am făcut-o de două ori ca să îmi ajungă. Data viitoare voi merge probabil pe a doua variantă.
ROYAL ICING
- 1 albuş mare
- 230 g zahăr pudră, cernut
- 1 linguriţă suc de lămâie
- colorant
Batem albuşul puţin cu mixerul la cea mai mică
viteză (câteva secunde).


Adăugăm cam două linguri de zahăr şi batem în continuare (tot la viteză mică) 2-3 minute.


Adăugăm sucul de lămâie, apoi restul de zahăr, 1-2 linguri o dată, până obţinem o pastă omogenă şi densă (când lăsăm glazura să curgă înapoi în castron, ar trebui ca vârfurile obţinute să se menţină cam 15 secunde).


Adăugăm cam două linguri de zahăr şi batem în continuare (tot la viteză mică) 2-3 minute.
Adăugăm sucul de lămâie, apoi restul de zahăr, 1-2 linguri o dată, până obţinem o pastă omogenă şi densă (când lăsăm glazura să curgă înapoi în castron, ar trebui ca vârfurile obţinute să se menţină cam 15 secunde).
Acum putem să adăugăm şi coloranţi, după
preferinţă, amestecând câteva linguri de glazură într-un alt castron până obţinem
culoarea dorită.
Umplem un cornet de hârtie sau un poş şi trasăm
conturul.


Pentru umplerea suprafeţei, adăugăm puţină apă
în glazură pentru a obţine o consistenţă mai moale (vârfurile obţinute când
lăsăm glazura să curgă înapoi în castron ar trebui să dispară după circa 8-10
secunde). Transferăm şi această glazură într-un poş şi umplem suprafaţa turtei
dulci, aranjându-o cu o scobitoare până ajunge la contur (putem pune glazura pe
turtă dulce şi cu o linguriţă, dar trebuie lucrat rapid pentru ca glazura din
castron să nu se usuce – cel mai bine ar fi să ţinem castronul acoperit).


Câteva sfaturi:
- dacă folosim aceeaşi culoare pentru contur şi suprafaţă, umplem suprafaţa imediat după ce am trasat conturul; dacă folosim altă culoare pentru suprafaţă, lăsăm conturul să se usuce puţin, apoi umplem suprafaţa cu grijă
- putem să decorăm turta dulce după ce s-a uscat primul strat de glazură, folosind pentru decoraţii royal icing consistent, sau imediat după ce am umplut suprafaţa, tot cu royal icing consistent – de data aceasta însă, decoraţiile se vor scufunda în glazură şi vor fi la acelaşi nivel cu glazura de umplere
- când decorăm suprafaţa umplută cât timp glazura nu s-a uscat, ne putem juca cu o scobitoare pentru a face diferite modele
- pentru detaliile mici, putem folosi o scobitoare (eu am făcut punctele negre pe ochii de buburuză)


******************************************************************************************************
March 1st I
walked on a new “land”, that of decorating gingerbread cookies with royal
icing. Initially I was afraid, but in the end it was a funny and interesting
experience and I am very satisfied with the results, although I know I still
have a lot to learn. I made a previous research on Rita Oarga's
blog, as she is a true artist of decorating gingerbread cookies (you can see
her works here) – royal icing recipe and tips for decorating – and on the website Joy of Baking. The recipe for the gingerbread cookies came
from Rita as well, but I transformed it a little,
playing with the flavors: because it's spring, I used a combination of cinnamon
(what kind of gingerbread would have been without it?), ginger, rose water and
ground lavender. What did I get? A floral, vernal gingerbread, which I cut in
lucky shapes: clover, horseshoe, ladybug and many flowers.
VERNAL GINGERBREAD COOKIES
- 1 kg flour
- 4 teaspoons ground cinnamon
- ½ teaspoon ground ginger
- ½ teaspoon ground lavender
- 1 teaspoon rose water
- 10 g baking powder
- 200 g icing sugar
- 3 eggs
- 250 g honey
- 300 g butter
We melt the honey and butter in a saucepan, over low heat, stirring from time to time. We then leave the mixture to cool.
We mix the sifted flour with the flavors and baking powder.
Separately, we beat the eggs with the sugar just for 2-3 minutes.
In a dent made in the middle of the flour, we add the egg and sugar mixture, then the honey and butter one and the rose water.
We start by stirring with a wooden spoon until the liquid is absorbed in the flour, then knead just until we obtain an homogeneous dough.
We divide the dough in two (or even four) parts, which we wrap in plastic and leave in the fridge until the next day (or at least 2-3 hours).
We remove the dough from the fridge 30 minutes before rolling it. We can now prepare the tray or trays, covering them with parchment paper, and little before starting making the gingerbread cookies, preheat the oven to medium heat (it should be like 30 minutes before baking the first tray).
We sprinkle some flour on the worktop and knead the dough until soft and with a smooth and shiny surface (it shouldn't be sticky, but if this is the case, sprinkle some more flour).
We roll the dough (it's easier to work with smaller pieces of dough) on the worktop sprinkled with little flour (if sticky, sprinkle some more flour, but not too much, enough to make a thin film), until it's 3-4 mm thick (I had portions thicker than that, but I had no problem when baking the cookies).
We cut the cookies with the cutters we want, depending on the occasion, our imagination, requests etc.
We put the gingerbread cookies on the tray, keeping some distance between them, and bake them for 5, 10 minutes at most. We leave them to cool in the tray for a few minutes, then transfer them on a wire rack or wooden tops until completely cool.
We keep the gingerbread cookies in airtight containers, where it stays fresh for about one month.
For decorating the gingerbread cookies with royal icing, there are two possibilities:
- we make one icing and use it when stiff to pipe the borders and for other decorations and when a little fluid, obtained by adding a small amount of water, to cover the surface
- we make two icings, one stiff and one more fluid (with a smaller amount of sugar)
Because it was the first time when I used royal icing, I used the first version, but make it twice to have enough for all the cookies. Next time I will probably use the second version.
ROYAL ICING
- 1 large white
- 230 g icing sugar, sifted
- 1 teaspoon lemon juice
- food coloring
We beat the white with
the electric mixer on low speed for a few seconds. We add about two tablespoons
of icing sugar and beat (on low speed) for 2-3 minutes. We add in the lemon
juice, then the remaining sugar, 1-2 tablespoons at a time, until the frosting
is stiff (when we lift the beater, the gibbon of icing falling back into the
bowl should remain on the surface for about 15 seconds).
We can now add the
food coloring, as we like, mixing a few spoons of icing in another bowl until
we obtain the desired color.
We fill a piping bag
with the icing and pipe the border.
In order to cover the
surface of the cookies, we add a little water to the icing until it has a “flooding”
consistency (the gibbon of icing falling back into the bowl should disappear after
8-10 seconds). We fill another piping bag with this icing and cover the surface
of the cookies, pushing it to the already piped border with a toothpick (we can
also use a teaspoon to pour the icing over the cookies, but we should work fast
as royal icing tends to harden when exposed to air – it would be best to cover
the bowl).
We let the cookies dry
completely for 12-24 hours.
Some tips:
- if we use the same color for the border
and the surface, we cover the surface immediately after piping the border;
if we use another color for the surface, we let the border dry a little,
then carefully cover the surface
- we can decorate the cookies once the first
layer of royal icing has dried, using the stiff icing, or immediately
after covering the surface, with the same stiff icing – this time however
the decorations will be at the same level with the surface
- when decorating the covered surface while
the icing is not dry yet, we can play with a toothpick to make various
patterns
- for smaller details, we can use a
toothpick (I made the black dots on the ladybugs eyes)
Niciun comentariu:
Trimiteți un comentariu